Long gone are the old FrontPage days. Today's modern HTML editors are well equipped with what you need. How the colors, fonts, font sizes, headings, hyperlinks, and much more, appear on the screen is all controlled through the CSS file.

The screenshot above shows the Common Toolbar in Expression Web. There are some items you should not use -- such as those for changing fonts, sizes, or colors. Using these items will add embedded styles (.auto-style1, .auto-style2, etc.) into the page. These embedded styles can cause conflicts with the external CSS file that comes with your template.
1Do not copy from MS Word and paste directly into Expression Web. Instead, copy and paste into a plain text editor like Notepad, and then copy and paste into Expression Web. This removes unwanted formatting.
2Do not change fonts, font sizes, colors, or text orientation by using the tools on the Common Toolbar. Doing so will embed styles that can cause problems. There's a better way.
In this example, we're going to use the Manage Styles panel to change the properties of the Heading 1 tag. Maybe you want this <h1> tag to be a different color, a larger font, perhaps centered with an underline. Rather than use the Common Toolbar (that adds embedded styles to only the current page), there is a much more efficient way to make changes to the CSS file.
Open the Manage Styles panel. I usually keep mine in Auto-Hide mode on the left side of the screen. This panel will show you the classes and IDs that are in the CSS file.

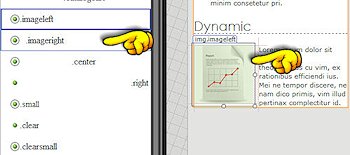
Hint: HTML tags are blue, IDs are red, and classes are green. The styles being used on the open page are circled.
Locate the h1 tag. When you mouse over it, you will see a box with all of the tag's properties listed.
If you right-click on the tag, you can choose Modify Style. This will open the Modify Style dialog box. In the "category" box, items that are bold are the properties that are current being used.

Under "font" you can see the font family, the font size, and the font color. You can change these in the dialog box. Once you have made your changes, click OK. This will apply the changes to the external CSS file.
If you prefer to dive right into the actual CSS file, you can right-click on the tag in the Manage Styles panel and choose "Go to Code". This will open the main CSS file and take you to where that style is located. You can make your changes and then save the file.
The Before: Original h1 rule
The After: Modified h1 rule - larger, red text, centered and underlined

At some point, you will want to apply a style to an element on your page. There are two easy ways to do this. One is with the Style toolbar (shown above); the other is with the Apply Styles panel (shown right).
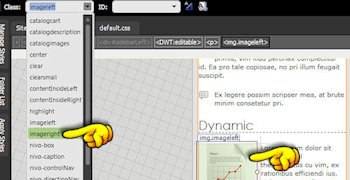
In this example, we are going to change an image that floats to the left to one that floats to the right.