I guess you could have a web site without any images, but most of us like to have some graphics sprinkled throughout our pages. They are a good way to add visual interest and to express ideas.
 Before you start adding images to your site, you need to first pay attention to the image's physical size
and also to its file size. We have all visited a site only to wait and wait and wait and then finally see that itty bitty image appear. If you right-click on that image, you
will probably see that the file size is huge and the reason for your wait. So you need to have your images web ready before you add them to your site. There are numerous image
editing software programs that can do this, as well as quite a few online sources.
Before you start adding images to your site, you need to first pay attention to the image's physical size
and also to its file size. We have all visited a site only to wait and wait and wait and then finally see that itty bitty image appear. If you right-click on that image, you
will probably see that the file size is huge and the reason for your wait. So you need to have your images web ready before you add them to your site. There are numerous image
editing software programs that can do this, as well as quite a few online sources.
No matter how you optimize your images, they need to be placed into your web site folder. We include an images folder in our template for this purpose.
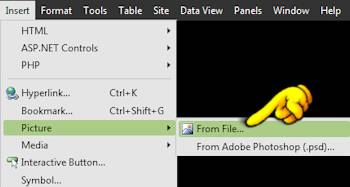
Expression Web makes inserting your images very quick and easy. You go to Insert > Picture > From File. Other web editors will also have something similar.
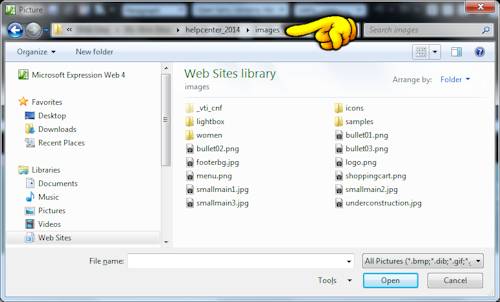
In the dialog window that opens, you will want to navigate to the images folder and find your image, highlight it, and click Open.
Once your image is on the page, right click on the image and choose Picture Properties from the menu that appears. A dialog box will open. This is where you need to double-check that the image you are inserting is actually within your web folder and not from another location on your hard drive. If you see a drive letter in the file path, you are not selecting from your images folder.
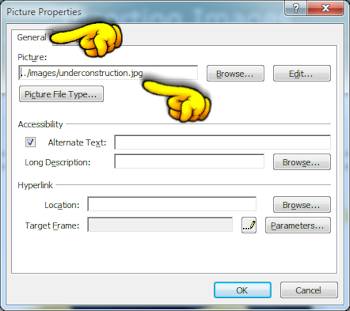
Expression Web will automatically place the width and height of the image into the html coding. Because we want images that will scale themselves on smaller devices, in the same dialog box you want to click on the Appearance tab and uncheck the box next to Specify Size.

You do not want to see the width or the height in the code:
On your template's typography page, we detail a lot of different ways you can aign and style your images. Want an image to float to the left of the content. No problem, there is a style for that. Want an image to appear round, or with a border or shadow? There are styles for that, too.
Hint: You can apply more than one style to an image so you can have a round image with a shadow.
There have been reports from users who add new images and then go to File > Preview in Browser but cannot see the new images. Others have reported that new hyperlinks do not work.
Update: This issue doesn't seem to be happening as often in IE's newer release these days, but we're leaving this information here just in case you need it.
Check your "preview" settings. Go to Site > Site Settings. In the preview tab, make sure "preview using website url" is selected. Under that, check "Use Microsoft Expression Development Server". Then, select "for all web pages".
We recommend that you also have the FireFox and Chrome browsers on your computer and preview your site in these browsers. You will notice that your new images are in place and are as they should be. (It's always a good practice to preview your web in both IE, FireFox, and other browsers as well.)