All three of these properties follow the box model as they affect space surrounding an element.
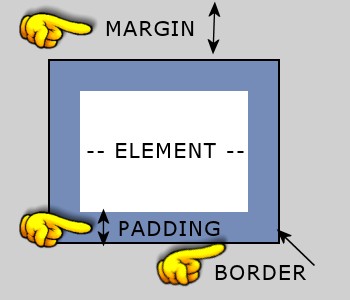
Margins define the space surrounding an element. In the example above, the margin is the gray area. You can set each margin individually as shown in the example below:
You can also use the margin shorthand property. In the example below, a 20 pixel margin will be added to all four sides:
If you use two values, the first value applies to the top and bottom and the second value applies to the right and left sides. An example would look like the following:
If you wish to use all four values, you can apply each value separately as follows:
Note that there are no commas, only a single space separates each value. You can also use percentages in place of pixels.
Border controls enable you to add a visible border around an area. You can specify the border's style, width, color, and you can set each individual side of an element.
Using the border shorthand properties, the attributes are listed as follows:
A shorthand property rule might look something like this, which applies a 1 pixel solid dark gray border:
Border-width: The border-width property accepts a length value such as 1px or a relative-size keyword such as thin, medium, or thick. A border-width of 0 will prevent a border from appearing.
Border-style: The border-style attribute refers to the type of border such as solid or dashed. note that not all values are recognized in all browsers. If a browser does not recognize a value, it will usually either be ignored or will display as a solid border. The different values are: none, dotted, dashed, solid, double, groove, ridge, inset, outset.
Border-color: The border-color property accepts a value in either hex or RGB. It will also accept a color name, but can have unexpected results. We prefer using a hex value.
Each border has four separate sides and you can define each side individually with the following properties:
It is possible to have a block with each side having a different width, color and style. (Although why would you ever want to?)
Padding sets the amount of space inside of a block element. In the box model image above, the padding is shown in blue. You can set each padding individually as shown in the example below:
Just as with margin properties, the padding properties can also use shorthand properties setting all sides the same, in pairs, or differently as in the examples below:
The float property is most commonly applied to images and divs and accepts the value of right, left, or none. If you have a need to display your images in various ways, you can define a class and apply the class to a single image. In this site, you will see our small icon images are floated to either the left of the right. Here are some examples:
 This example has the image floated to the left without an
image border. It sits to the left side of the containing block and the text will
flow around the image. The coding is as follows:
This example has the image floated to the left without an
image border. It sits to the left side of the containing block and the text will
flow around the image. The coding is as follows:
This is the same image, but it is floated to the right.
Again the image will sit in its position and the text will flow around
it. The coding is as follows: